| >> | !///SWFAnts 9feb2013(sa)19:01 No.5544 OP P1 How to make a simple flash loop How to make a simple flash loopThis guide will show you how to make a classic, proper, flash loop in its simplest form. All you need: + Adobe Flash Professional CS6 (or later/earlier)
+ Mp3 music file
+ Gif image file |
|
| >> | !///SWFAnts 9feb2013(sa)19:03 No.5545 OP P2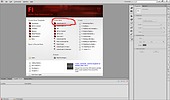 STEP 1: Create Project STEP 1: Create Project+ Start Flash Pro.
+ Click "ActionScript 3.0" under "Create New".
+ Go to "File" > "Save". Decide what to call your flash loop. I name my project file "pizza_time.fla" so the flash loop will be named "pizza_time.swf". |
|
| >> | !///SWFAnts 9feb2013(sa)19:03 No.5546 OP P3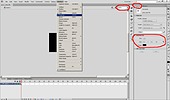 STEP 2: Set Document Properties STEP 2: Set Document Properties+ Check the width and height of your gif-image. This can be done in a number of ways, for example by opening it in Paint and going to "Image" > "Attributes". Just howering over the file in Explorer might give you the dimensions as well.
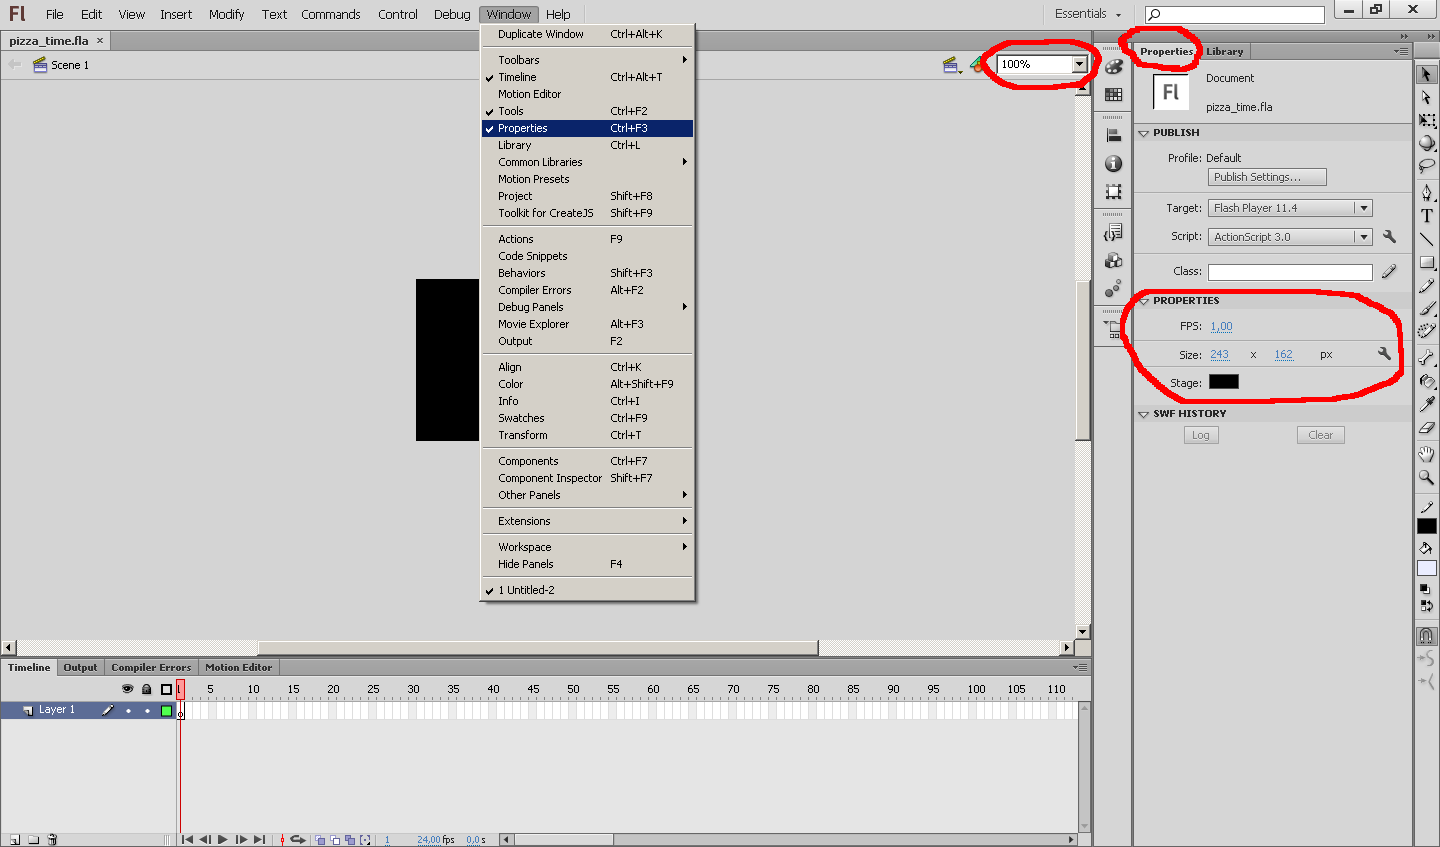
+ Return to Flash Pro. Press V (shortcut) to make sure the Selection Tool is in use. You can also click the black mouse cursor icon that probably is located to the far right of your screen.
+ Click anywhere on the stage (the background) to "highlight" the document. Check "Window" > "Properties" (if there's a checkmark next to "Properties" it is showing). Locate it in the interface.
+ Set the size of your flash to that of your gif-image. My image is 243x162.
+ Set the background color to black (it looks best when someone is viewing your flash with incorrect dimensions and can see outside the stage).
+ Set the framerate to 1 fps (when importing a gif-image Flash Pro tries to match its framerate to your flash's framerate but it often turns out with too many empty frames here and there. By setting the frame rate low you ensure that all key frames are next to each other).
+ Center the stage by zooming out to 50% and in to 100% again (use the drop down menu in the main project tab).
+ Press CTRL + S to save your project. |
|
| >> | !///SWFAnts 9feb2013(sa)19:04 No.5547 OP P4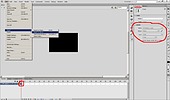 STEP 3: Import audio STEP 3: Import audio+ Check "Window" > "Timeline" (if there's a checkmark next to "Timeline" it is showing). Locate it in the interface.
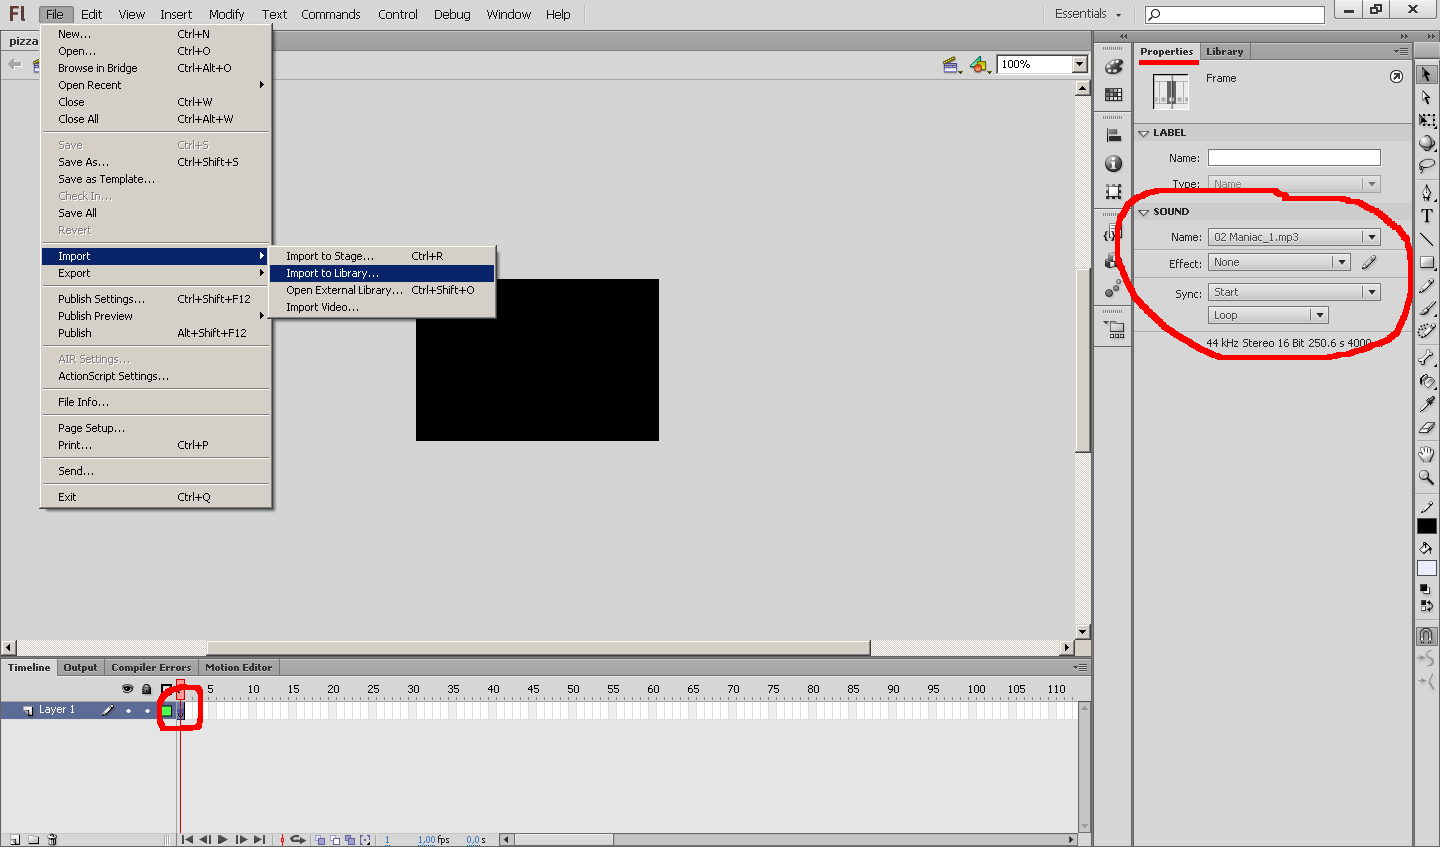
+ Go to "File" > "Import" > "Import to Library...". After the annoying "Preparing to import" loading bar is gone, browse and select the mp3-file you wish to use. I will use the song "Maniac" by Caravan Palace since it kind of goes with the visuals a bit.
+ Click the first keyframe in the Layer 1 row in the Timeline tab. Look at the "Properties" tab, since you clicked a keyframe it now relates to it instead of the project (document) itself like before.
+ In the "sound" section of the properties tab, click the "Name" drop-down menu. Select your imported mp3-file ("02 Maniac_1.mp3" for me).
+ Now click the "Sync" drop-down menu. Select "Start". This is VERY important. It tells the Flash Player to start playing the sound when this frame is entered, but not if it's already playing.
+ Click the drop-down menu below that contains the "Repeat" text. Select "Loop". This also important so that your music keep playing on repeat forever.
+ Press CTRL + S to save your project. |
|
| >> | !///SWFAnts 9feb2013(sa)19:05 No.5548 OP P5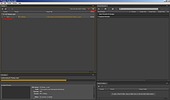 STEP 3 EXTRA: If the audio can't be imported... STEP 3 EXTRA: If the audio can't be imported...+ When you import your mp3-file in Flash Pro you can get the following error: "Couldn't import '<path to mp3>'." This is most likely because the bit rate is too high or too variable for Flash Pro to read it. You need to convert your audio before you can use it.
+ Converting it can be done in many manners. One way is by importing the mp3 into freeware Audacity and then exporting it as a WAV file and then use that in your loop. Another is by using "Adobe Media Encoder". I'll show how to do it that way because Adobe's media encoder is often included with Flash Pro so you don't need to download anything else.
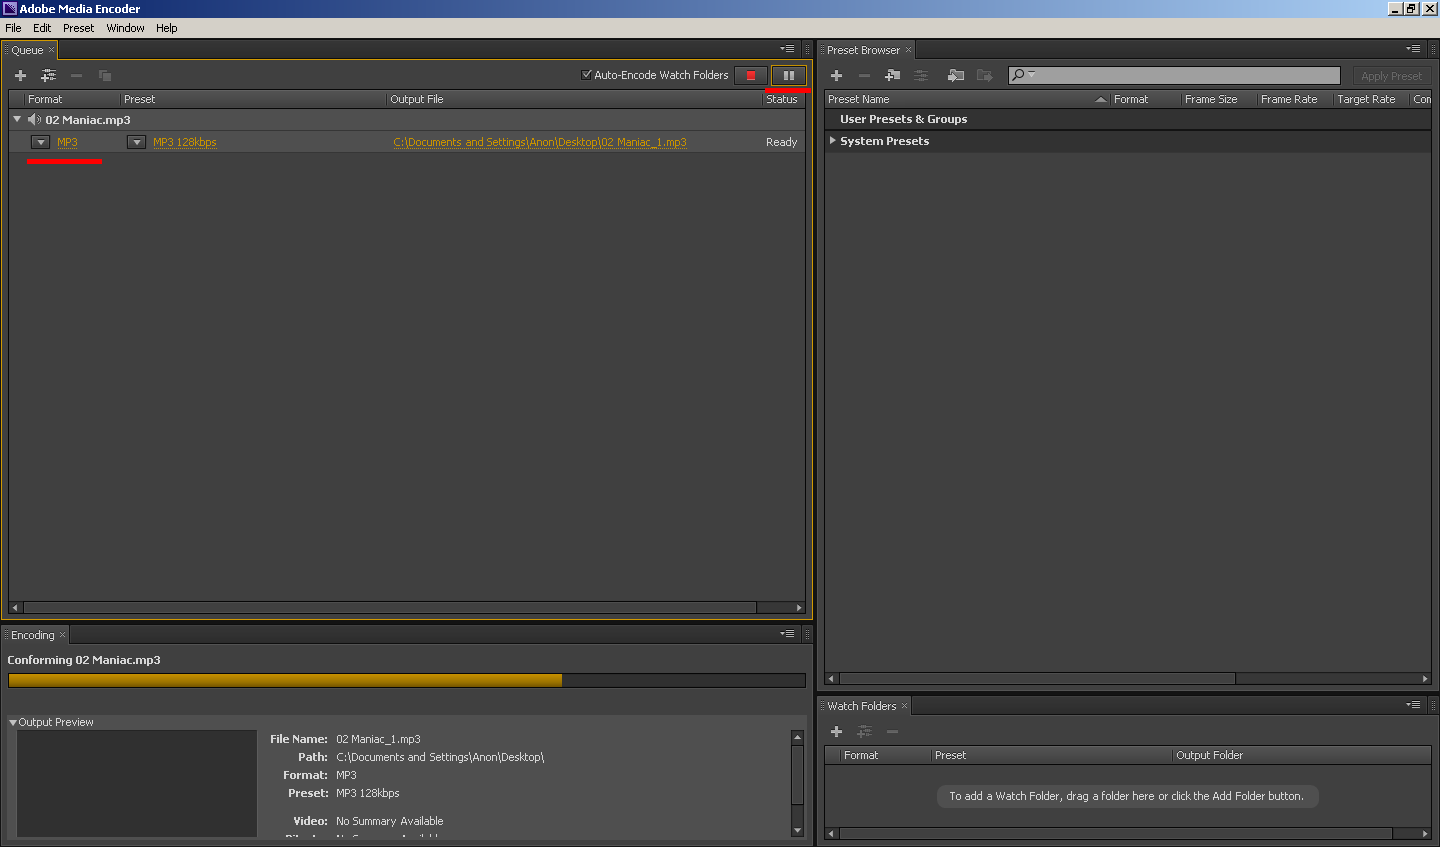
+ Start "C:\Program Files\Adobe\Adobe Media Encoder CS6\Adobe Media Encoder.exe" (or wherever it is). Go to "File" > "Add Source..." and select your mp3-file. It'll be queued for conversion.
+ Make sure the conversion format for the file is "MP3" (first drop-down). Second column will then say "MP3 128kbps", which is fine for our purpose. Press the green play button to start conversion.
+ Once it finishes, return to Flash Pro and import the new mp3-file you've created. Then continue with step 3. Tip: When you use Adobe Media Encoder it will create "cache files" that doesn't get deleted automatically. If you don't remove them they will linger on and just take up disk space. Go to "Edit" > "Preferences..." and click "Media". Press the "Clean" button. It's for some reason however not certain that this removes all of the cache, check the location path that they have written down above the clean button and go into the "Media Cache Files"-folder. If there is anything left in there you can delete it (best exit the Adobe Media Encoder program first). |
|
| >> | !///SWFAnts 9feb2013(sa)19:06 No.5549 OP P6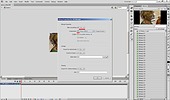 STEP 4: Import visuals STEP 4: Import visuals+ Go to "File" > "Import" > "Import to Stage...". Select your gif-image. The gif will split into separate key frames, these are added to the timeline beginning on the frame you have selected (since you should only have one frame upon import you don't need to think about that).
+ Press CTRL + S to save your project. It might take a little longer to do so this time.
+ Check "Window" > "Library" (if there's a checkmark next to "Library" it is showing). Locate it in the interface.
+ A number of items is in the library: Your audio file, gif ("pizza time.gif" for me) plus a bunch of "Bitmap <number>". The item named as your gif is actually only the first frame of the gif and the "Bitmap" items are the rest of the gif's frames.
+ Press any item in the library, then press CTRL + A to select all items. Find the audio item, hold CTRL while you click it once to remove it from the selection.
+ All bitmaps from the gif are now highlighted in the library. Click one of the highlighted items and enter "Properties...".
+ Select "Yes" to allow smoothing (use the drop-down menu). This makes the images scale better when the flash is viewed with incorrect dimensions. Enlarged visuals will blur a bit, if this is an issue with you and you prefer "pixly" images then don't allow smoothing.
+ Select Photo (JPEG) compression (tick the checkbox). Leave quality on "use publish settings". If you forget this the frames of the gif is stored in lossless quality which increases the flash loop file size by a whole lot more than it is worth.
+ Always use JPEG compression unless the gif image you imported had a small file size (meaning that the animation was optimal for gif - it had few colors and straight edges etc, for example it might have been a sprite from an old fighting game).
+ Hit OK and press CTRL + S to save your project. Tip 1: You can remove unwanted frames from your visuals if you want to, right-click them on the timeline and select "Remove Frames". This will reduce the file size of your final flash loop. You don't need to bother with removing the image items from the library - since they aren't used they won't be exported with the final swf-file. Tip 2: If one or more images in the gif are supposed to be displayed longer than the other you can "add some display time" to them. Left-click their keyframes on the timeline and press F5 to add length to it. You can select many keyframes while holding CTRL and then press F5 to add length to all of them. |
|
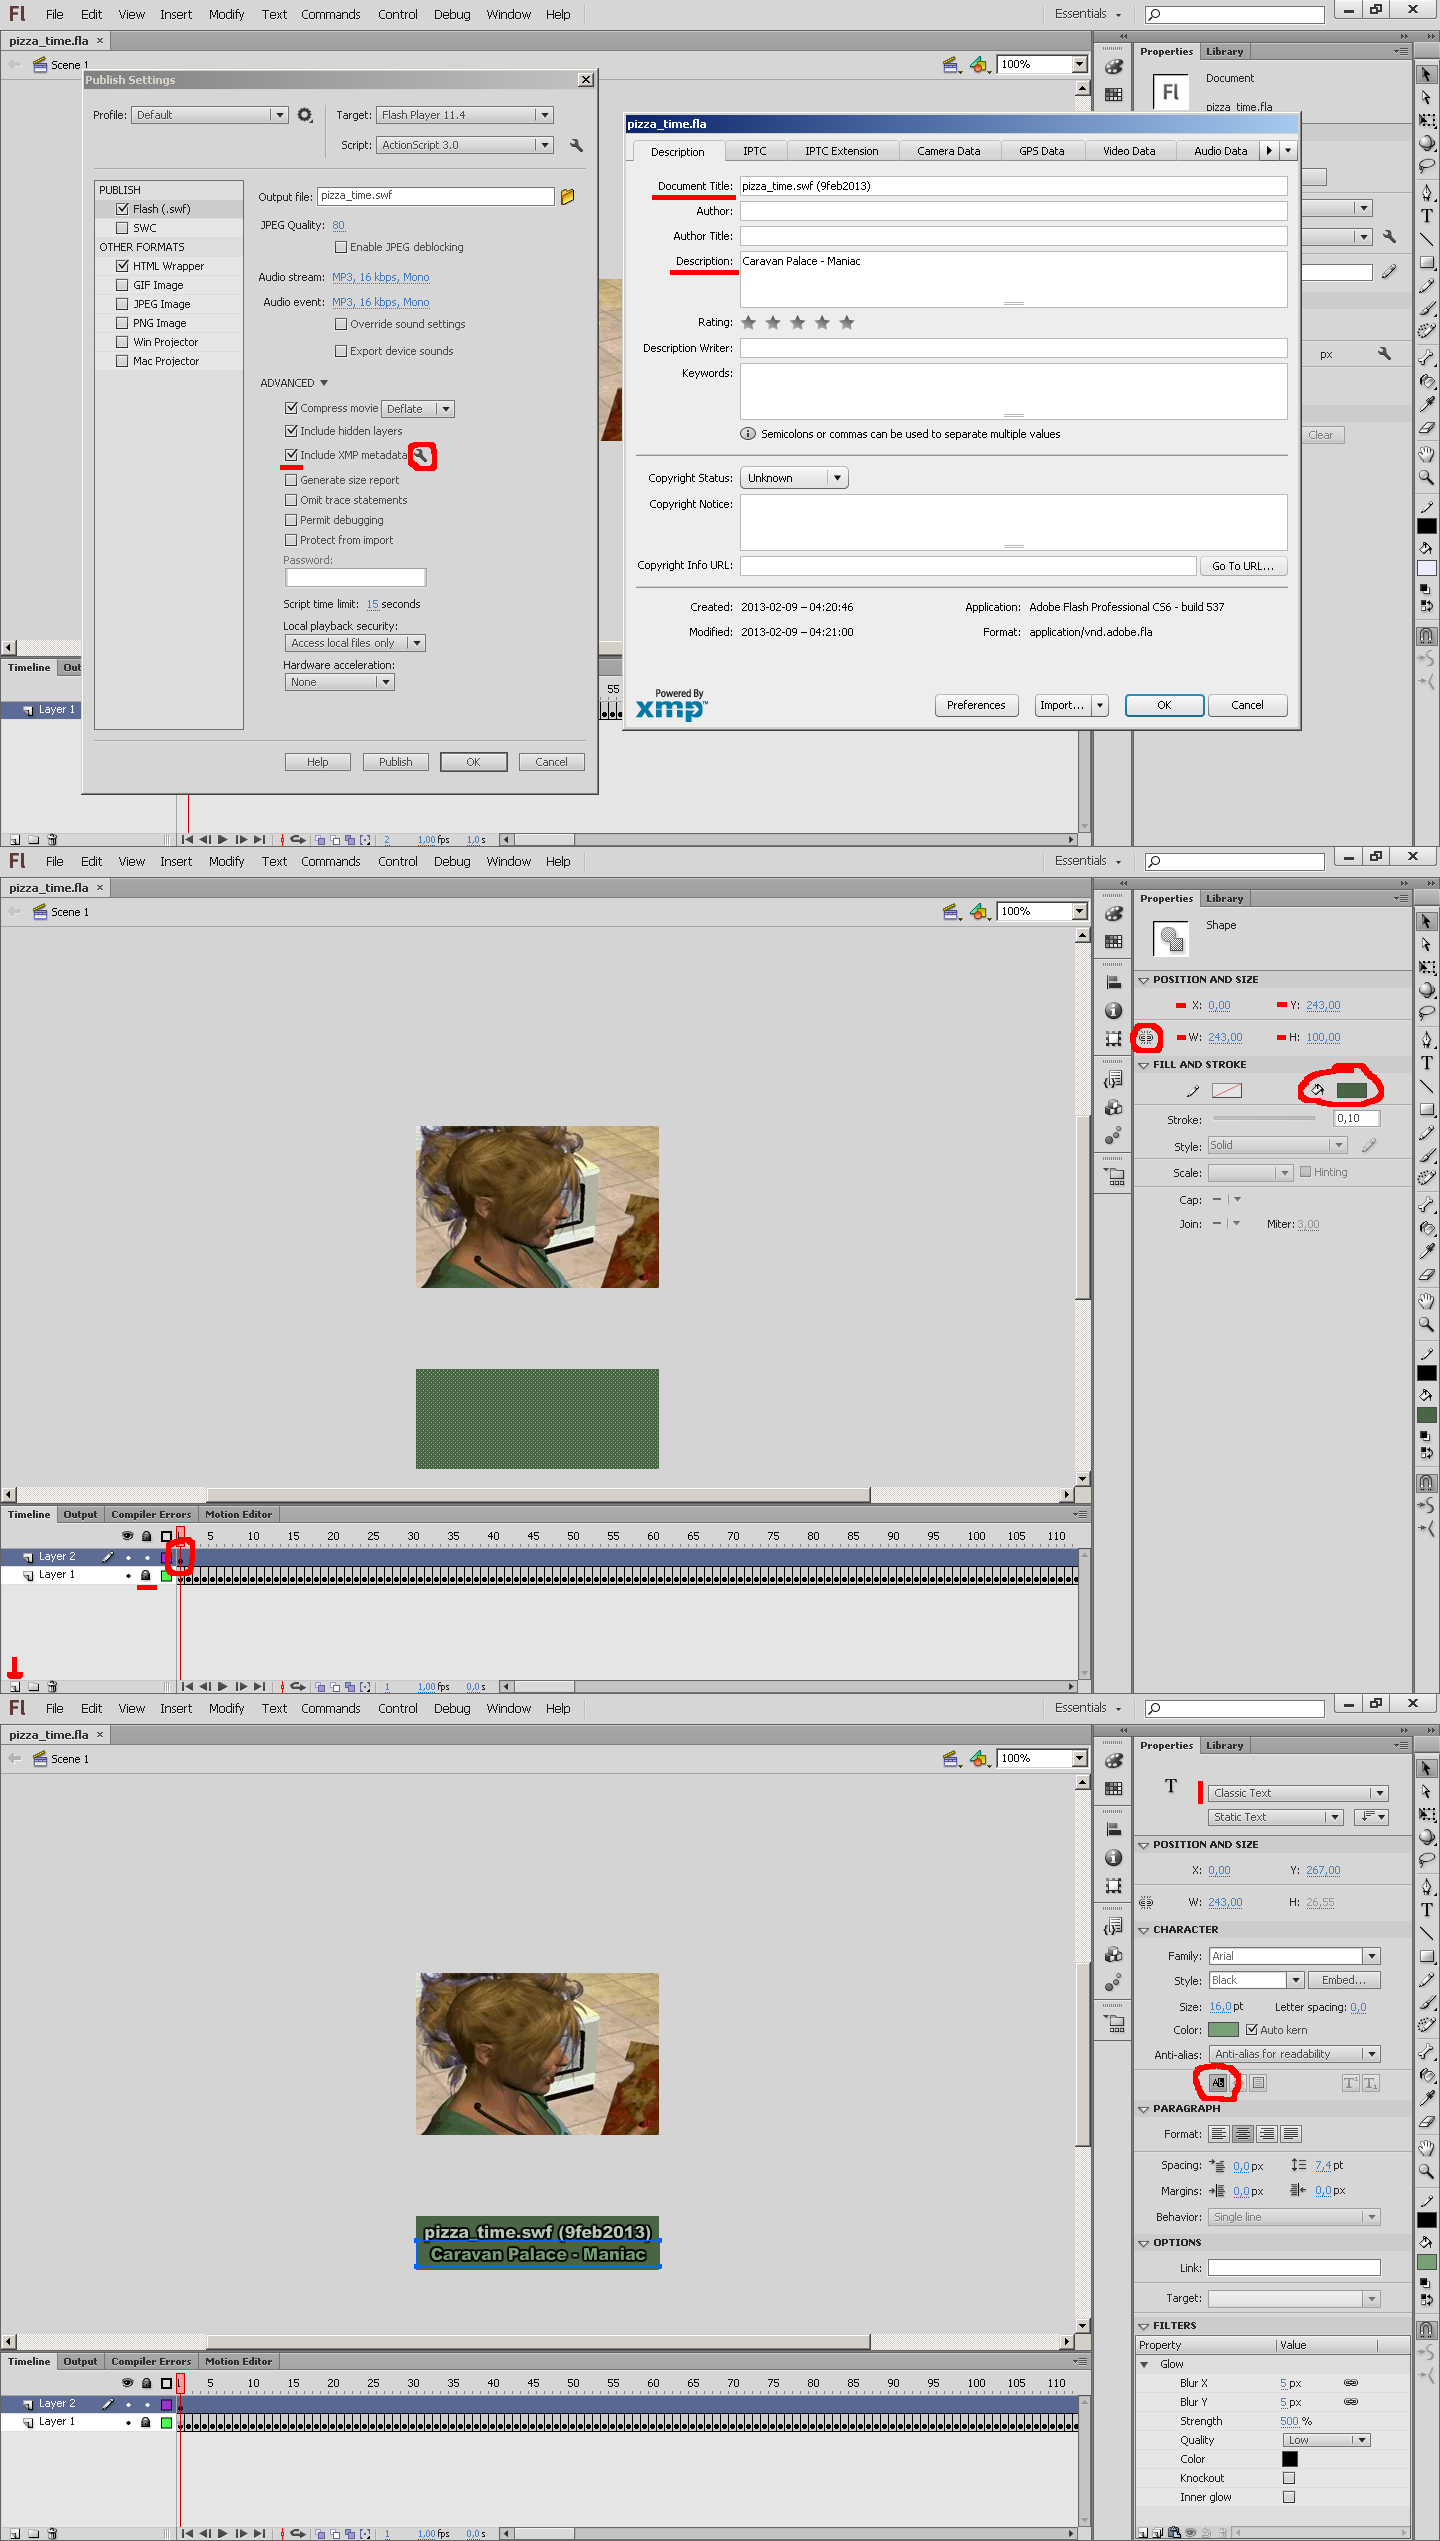
| >> | !///SWFAnts 9feb2013(sa)19:07 No.5550 OP P7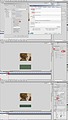 STEP 5: Adding audio/visual source STEP 5: Adding audio/visual sourceThis may seem trivial but making a note of it in the flash can help thousands of people find good music/movies/artists all over the world. It saves time for many. And let's not forget that your flash might be around forever on the net so in two hundred years the source might be lost forever unless you actually include it in the flash. Personally I like to include source in two ways: In the XML of the flash and below the visuals. The XML is currently mainly used by search engines or by those that really dig into a file. It will for example help someone find your flash if they search the net for the music title you use in the flash. Including the source "below the visuals" means putting some text outside of the stage - if the flash player is resized to an incorrect ratio it will reveal the source. True that this isn't much good unless you know where to look, but I admit I like how this "trick" has become something passed on by word-of-mouth from person to person in the flash community. Almost like a secret known only to insiders. Another way of giving source that I find acceptable (but don't use myself) is by putting it in the right-click context menu of the flash player. As long as no standard player options are removed I think this is quite fine since people might actually find it by themselves. It requires some ActionScript coding however, something I think should be avoided in a simple flash loop (can mention that I don't approve of loaders in flash loops, but those with a play button are the worst kind - a flash loop should always auto-start). I don't think it's good when source is placed in plain-view in the corner of the stage. Sure, nobody will miss it but it ruins the flash loop since it blocks part of the visuals and is distracting. Watermarks are ugly and makes the loop unclean (especially if they are just your nickname - real loop makers don't feel the urge to mark their loops with a name, at least not plain visible). + Go to "File" > "Publish Settings...". Under advanced, make sure "Include XMP metadata" is ticked. Click the wrench icon next to it to modify the document metadata.
+ In document title I usually put this: <file name> (<today's date>) So for me this time I type the following in: "pizza_time.swf (9feb2013)". Try to avoid using numbers for both month and day since there's no global standard on the order of these two ("09-02-13" means both 2sep2013 and 9feb2013 - or is it 2009 and not 2013? Nobody can know unless you also write down which country you live in).
+ In description I place audio/visual source. Since I'm just using a random gif I found online I unfortunately don't have source for that. I usually spend a moment searching for visual source if I don't have it, today I came up with nothing. I do know the song I used though so I put that there ("Caravan Palace - Maniac"). + For the source "below the visuals" you first lock Layer 1 on the timeline by clicking the second white dot to the left of all of the frames, the dot is located below a picture of a pad lock. Then create Layer 2 by clicking the small New Layer icon in the lower left of the screen. Click the first frame on Layer 2. Notice how it spans all the other frames of the flash loop? It means that this frame will always show.
+ Use the rectangle tool (shortcut R) and draw a rectangle. This will be the so-called "source bar". By default it has a thin border around it, which I usually delete. Double-click that border (will select only the border) and press the delete key. Now click the color-filled rectangle. Notice how the properties tab reflects your selected object? Under "Fill and Stroke", press and set the color to something fitting. You can sample something from the visuals perhaps.
+ Position the rectangle to X=0 and Y=<stageHeight*1.5> (the wider your stage is compared to its height, the higher you must set Y to prevent the source bar from always be visible when the flash loop is viewed in fullscreen - if your stage is wider than its height you can use the following formula: Y=<stageWidth/stageHeight*stageHeight>). Round Y to an integer.
+ Set the rectangle width to stageWidth and its height to 100 or so, depending on how much you want to fit in the source bar. Click the small chain-icon if the width/height ratio is locked. + Change to the text tool (shortcut T) and mark out one or more text fields. Type in the same info that you put in the XML. Position them so they are above the source bar. Try to make sure that the X and Y values are rounded integers. That way positioning of the text looks best when the flash is scaled.
+ Use the properties tab to color them so they are easy to read against the source border background. Maybe add a filter effect. Use a nice font (remember to Embed the font if you are using a special font that might not exist on all systems - if so do NOT tick anything in Character ranges, just repeat the text in the "also include these characters" text area. That way the flash loop file size is not bloated by the embedded font).
+ In the properties tab for the text fields it is nice to make those containing source selectable. If it says "Classic Text" at the top of the properties tab, find the "selectable"-icon and press it (it's in the character section). If it says "TLF Text" at the top of the properties tab, select "Selectable" from the drop-down menu near the top (might currently say Read Only).
+ Adjust the height of the rectangle in the background if need be. + Finally press CTRL + S to save your project. Tip 1: You can use math when setting numerical values, for example the Y value can be set to 162*1.5 and when you press enter Flash Pro will solve the equation. Tip 2: This post just describes how I like to give source. You can of course do it anyway you like. Or skip giving source completely, but that's not cool. |
|
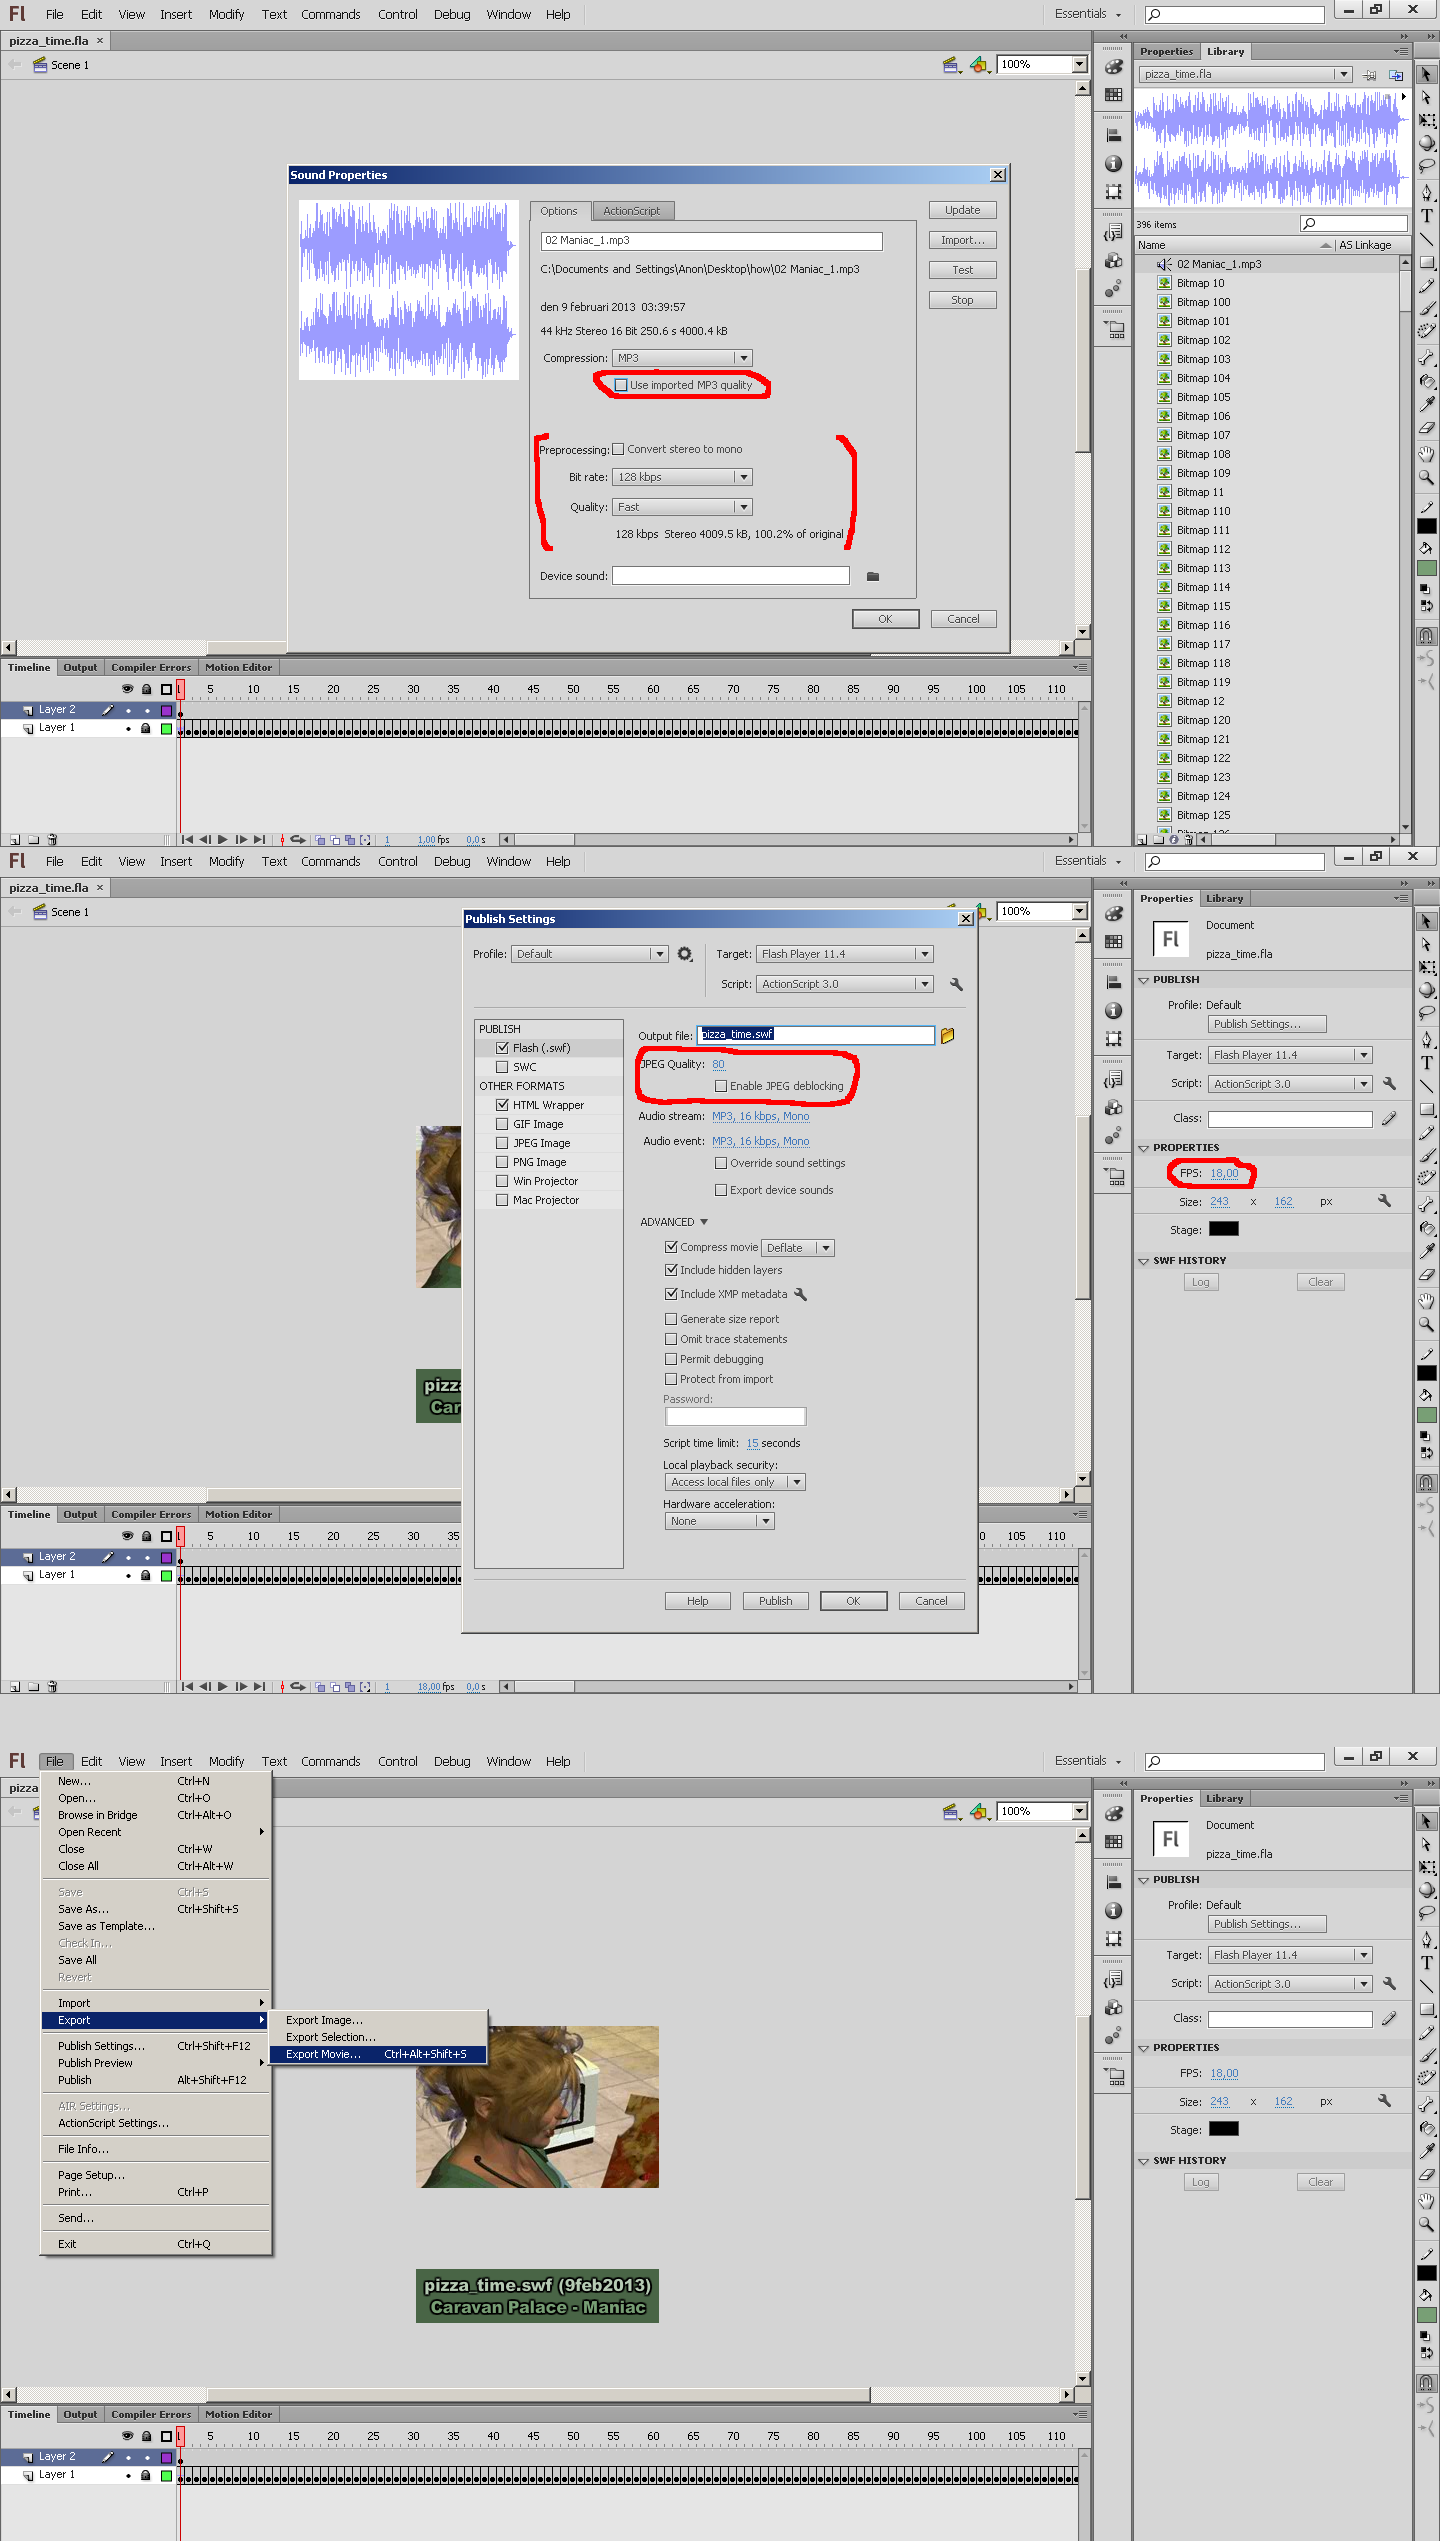
| >> | !///SWFAnts 9feb2013(sa)19:08 No.5551 OP P8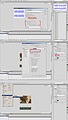 STEP 6: Export STEP 6: Export+ Go to the library tab. Find the audio item, right-click on it and select "Properties...". If possible, tick "Use imported MP3 quality". Not only is the quality preserved but it also makes exporting your project go quicker since no audio processing is needed. Using imported quality will not work if the mp3 audio encoding is not valid for the flash format.
+ If imported MP3 quality cannot be selected two drop-down menues and a checkbox is visible. Set Bit rate to 128 kbps (no reason to go higher on a flash loop - however set it lower if you know your audio source file had lower than 128 to begin with). Untick "convert stereo to mono" (only use mono if you have low bit rate - then it actually improves quality). Leave quality on Fast (might add artifacts to the sound on repeat otherwise).
+ Press OK to close the dialogue. + Click the empty background to select nothing. The properties tab is now for the Document.
+ Set the FPS to what you think suits the visual animation, with the song in mind. Should it go extra fast? Slower than normal maybe? A good place to start if you don't have a clue is 18 FPS. + Go to "File" > "Publish Settings..." (there should also be a button to go there on the properties tab).
+ Adjust JPEG Quality if you think it's needed. 80 is a good start value though, unless you have a lot of frames. You can leave "Enable JPEG deblocking" unticked since it might remove details from images. However if you lower the JPEG quality it can be smart to actually use it, else a bothersome square artifact-pattern might appear in your images.
+ Press OK to close the dialogue. + Press CTRL + S to save your project.
+ Go to "File" > "Export" > "Export Movie..." and save your flash file, in my case "pizza_time.swf".
+ Preview your product; drag it into your browser or launch it with Flash Player. Check if it looks good.
+ Have a close look at the file size, did it turn out too big? High audio quality can really inflate the loop, especially if you put a whole song in there.
+ Go back into Flash Pro and change the JPEG or audio quality if need be. Nudge the frame rate. Save. Export. Repeat until happy with animation tempo, overall quality AND not-too-big file size. In my case for pizza_time.swf I changed FPS from 18 to 23, lowered JPEG quality from 80 to 55, turned on JPEG deblocking and switched sound compression from "Use imported MP3 quality" to 56 kbps mono. Why so low quality? At first try the loop took 7.61 MiB. Lowering the image quality decreased it by 2.64 MiB. Lowering the audio quality decreased it by another 2.18 MiB, making it land on a final file size of 2.79 MiB. Considering the overall poor value of my loop in this example I didn't think it was worth almost 8 MiB. Almost 3 MiB also feels too big for it but it's definitely more reasonable. Sure it could have been lowered further but some quality is needed to give the flash loop any value what-so-ever. Usually I don't use such long visuals and never a whole song, so I normally don't have to sacrify much media quality. But it serves as a good example: pick your visuals well and preferably cut the audio before you import it! Tip: I prefer setting the flash frame rate to integers, but remember that you can set it to for example 20.1 if you think that syncs it better to your audio. |
|
| >> | !///SWFAnts 9feb2013(sa)19:09 No.5552 OP P9 |
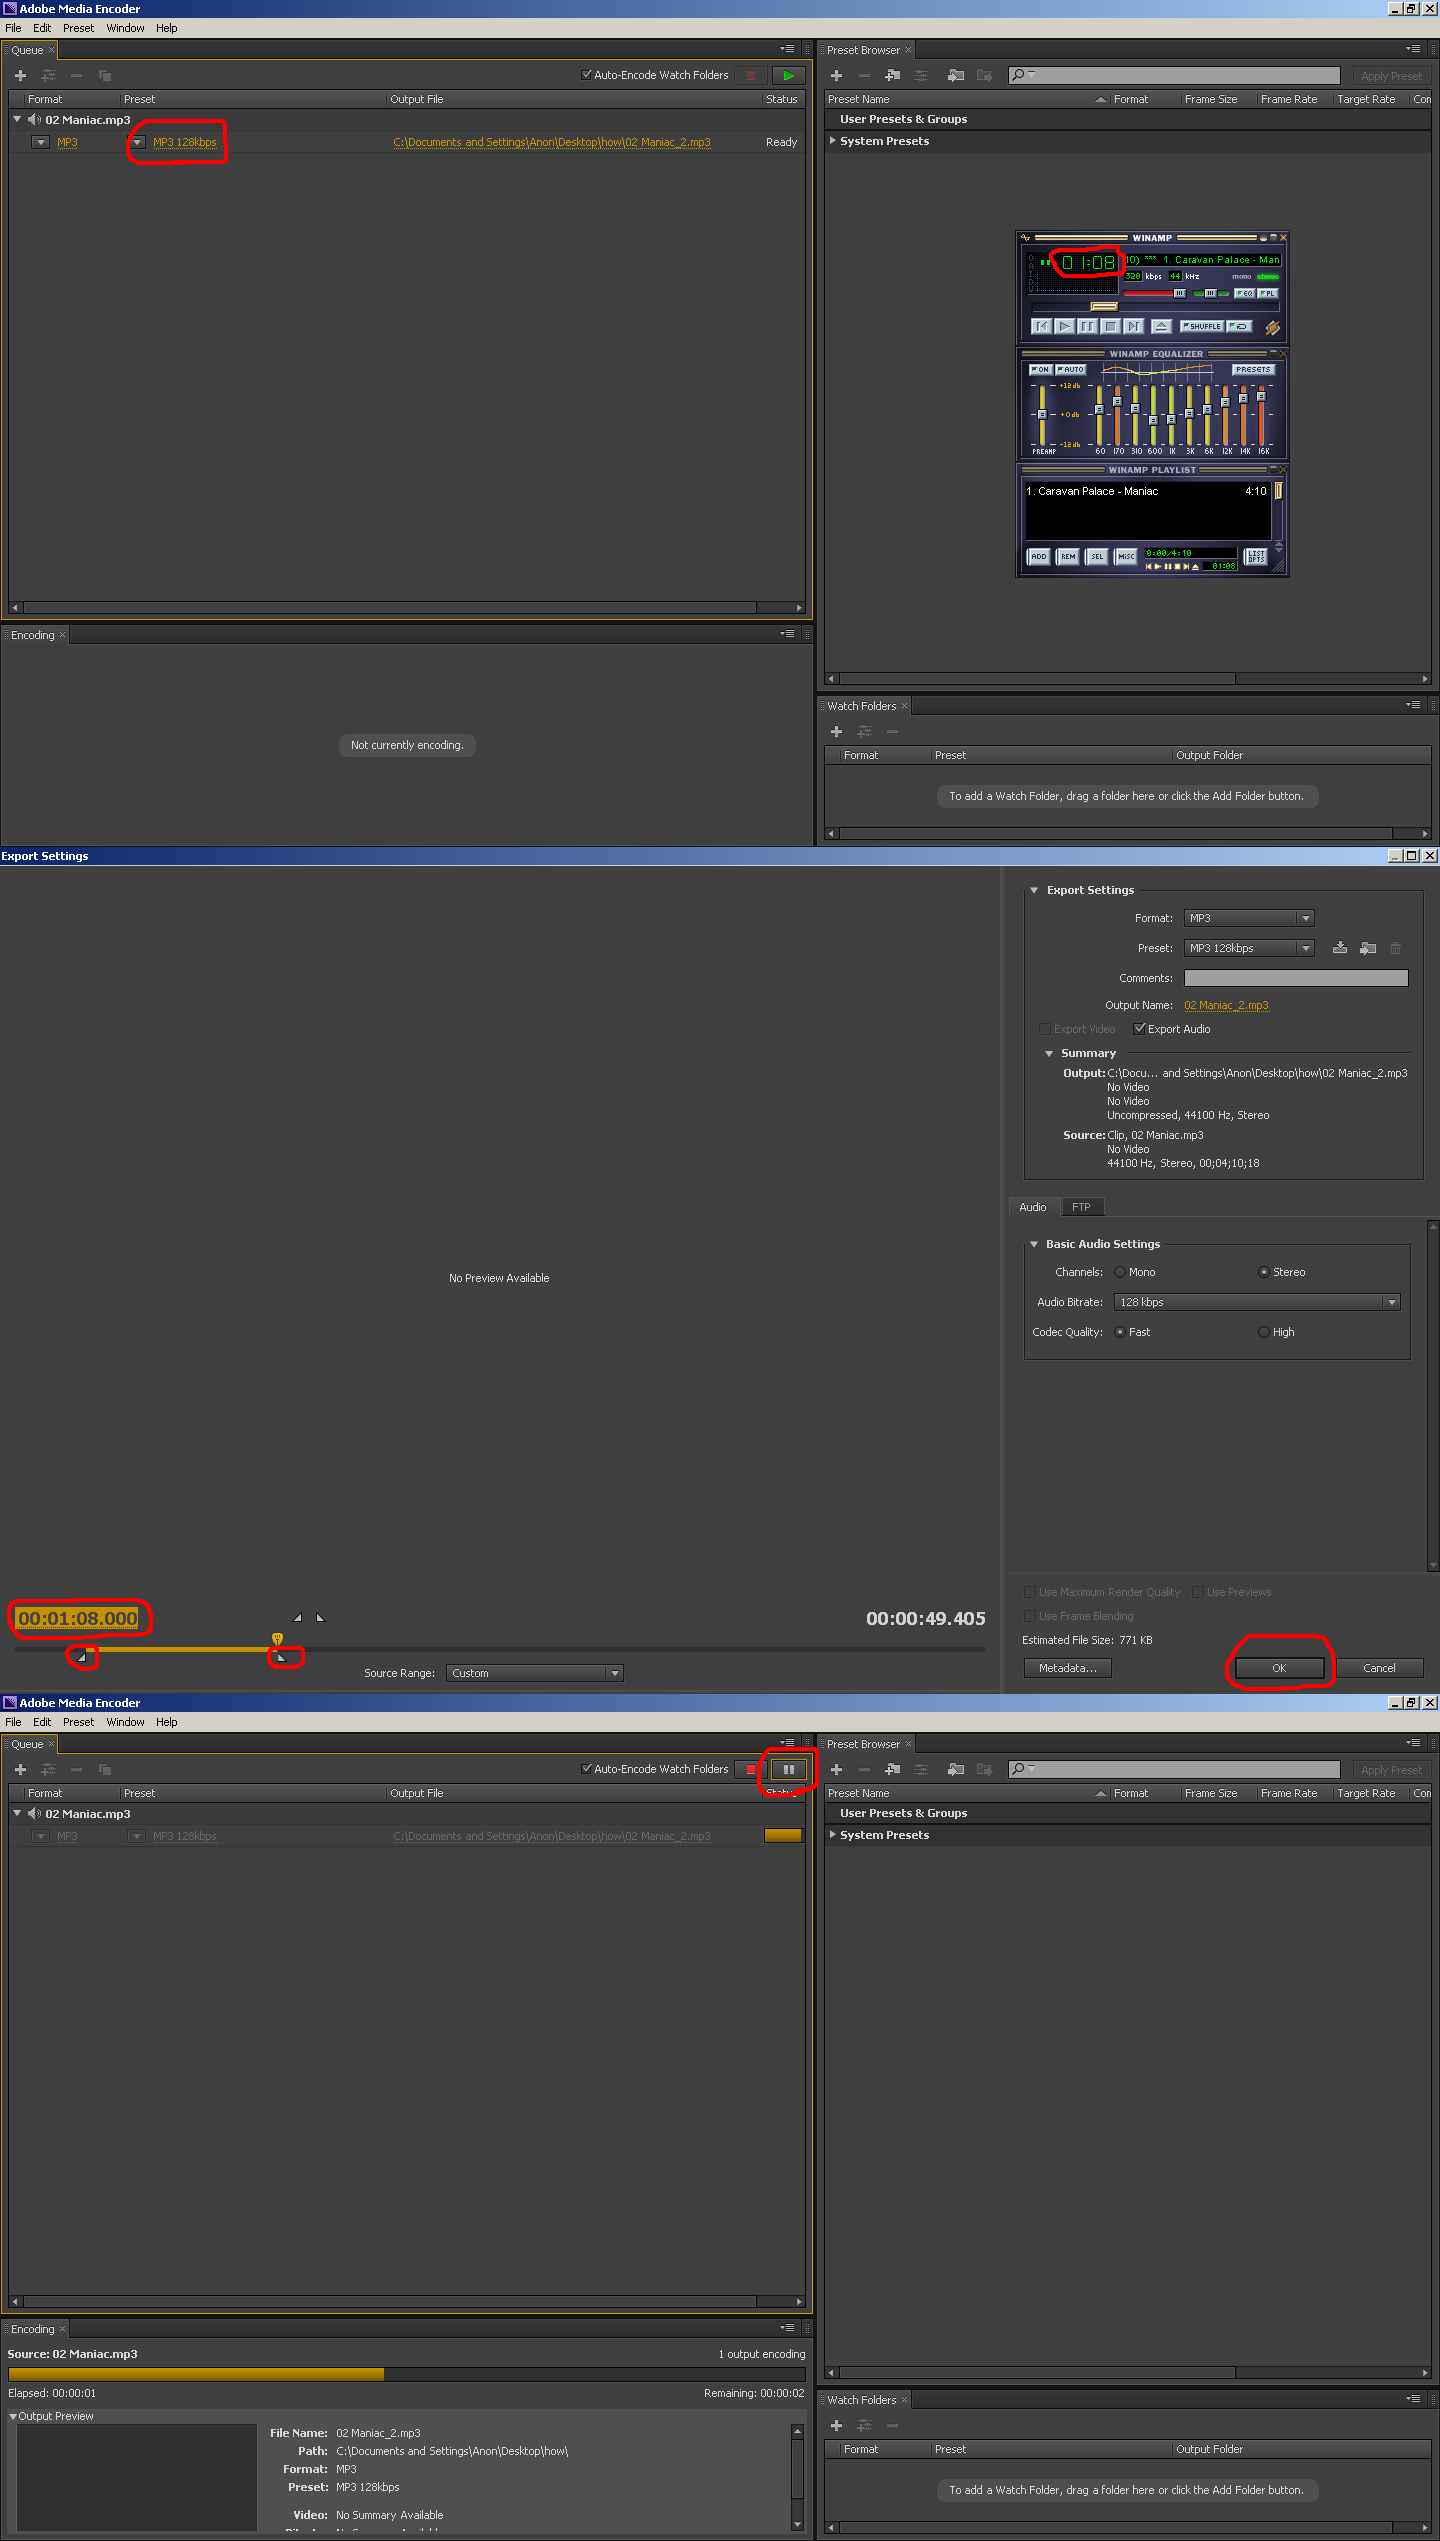
| >> | !///SWFAnts 9feb2013(sa)20:34 No.5555 OP P10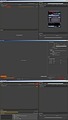 BONUS 1: Cutting your audio BONUS 1: Cutting your audioIf you want to only include part of a song and not the whole thing there's a simple way to make a crude cut out of it. + Launch Adobe Media Encoder and add the song to the queue (set output format to MP3).
+ Play the song in your favorite music player (WinAmp for me). Seek to where you want the cut to begin (00:18 for me). Remember the time stamp. Then seek to where you want the cut to end (01:08 for me). Remember the time stamp.
+ In the media encoder, click on the text in the preset column (MP3 128kbps). This opens up the export settings.
+ At the bottom there is a seek bar with two set points (triangles) just below it. These signify where the audio will begin and end. Drag the left set point so that the timer text above the seek bar reads as the first time stamp that you were supposed to remember (00:18 for me).
+ Click on the timer text. Change it so that it equals the second time stamp that you were supposed to remember (01:08 for me). Press enter key. The marker above the seek bar will change position to that time.
+ Drag the right set point so that it lines up with the marker. You have now defined a crude start and end of the music you wish to use.
+ Press OK to close the export settings and hit the green play button to start conversion. Import the resulting mp3-file into Flash Pro. Using a cut song is good for several reasons. You'll get rid of any intro that can be undesirable (a decent flash loop often starts right in the action, no calm beginning) and you'll get rid of any outro that can be undesirable (making the repeat of the song sound better). Last but not least you'll reduce the file size of your final loop. Maybe you predict most people will close the loop after a short while without listening to the full song, then it would be unnessecary for you to include the entire track. |
|
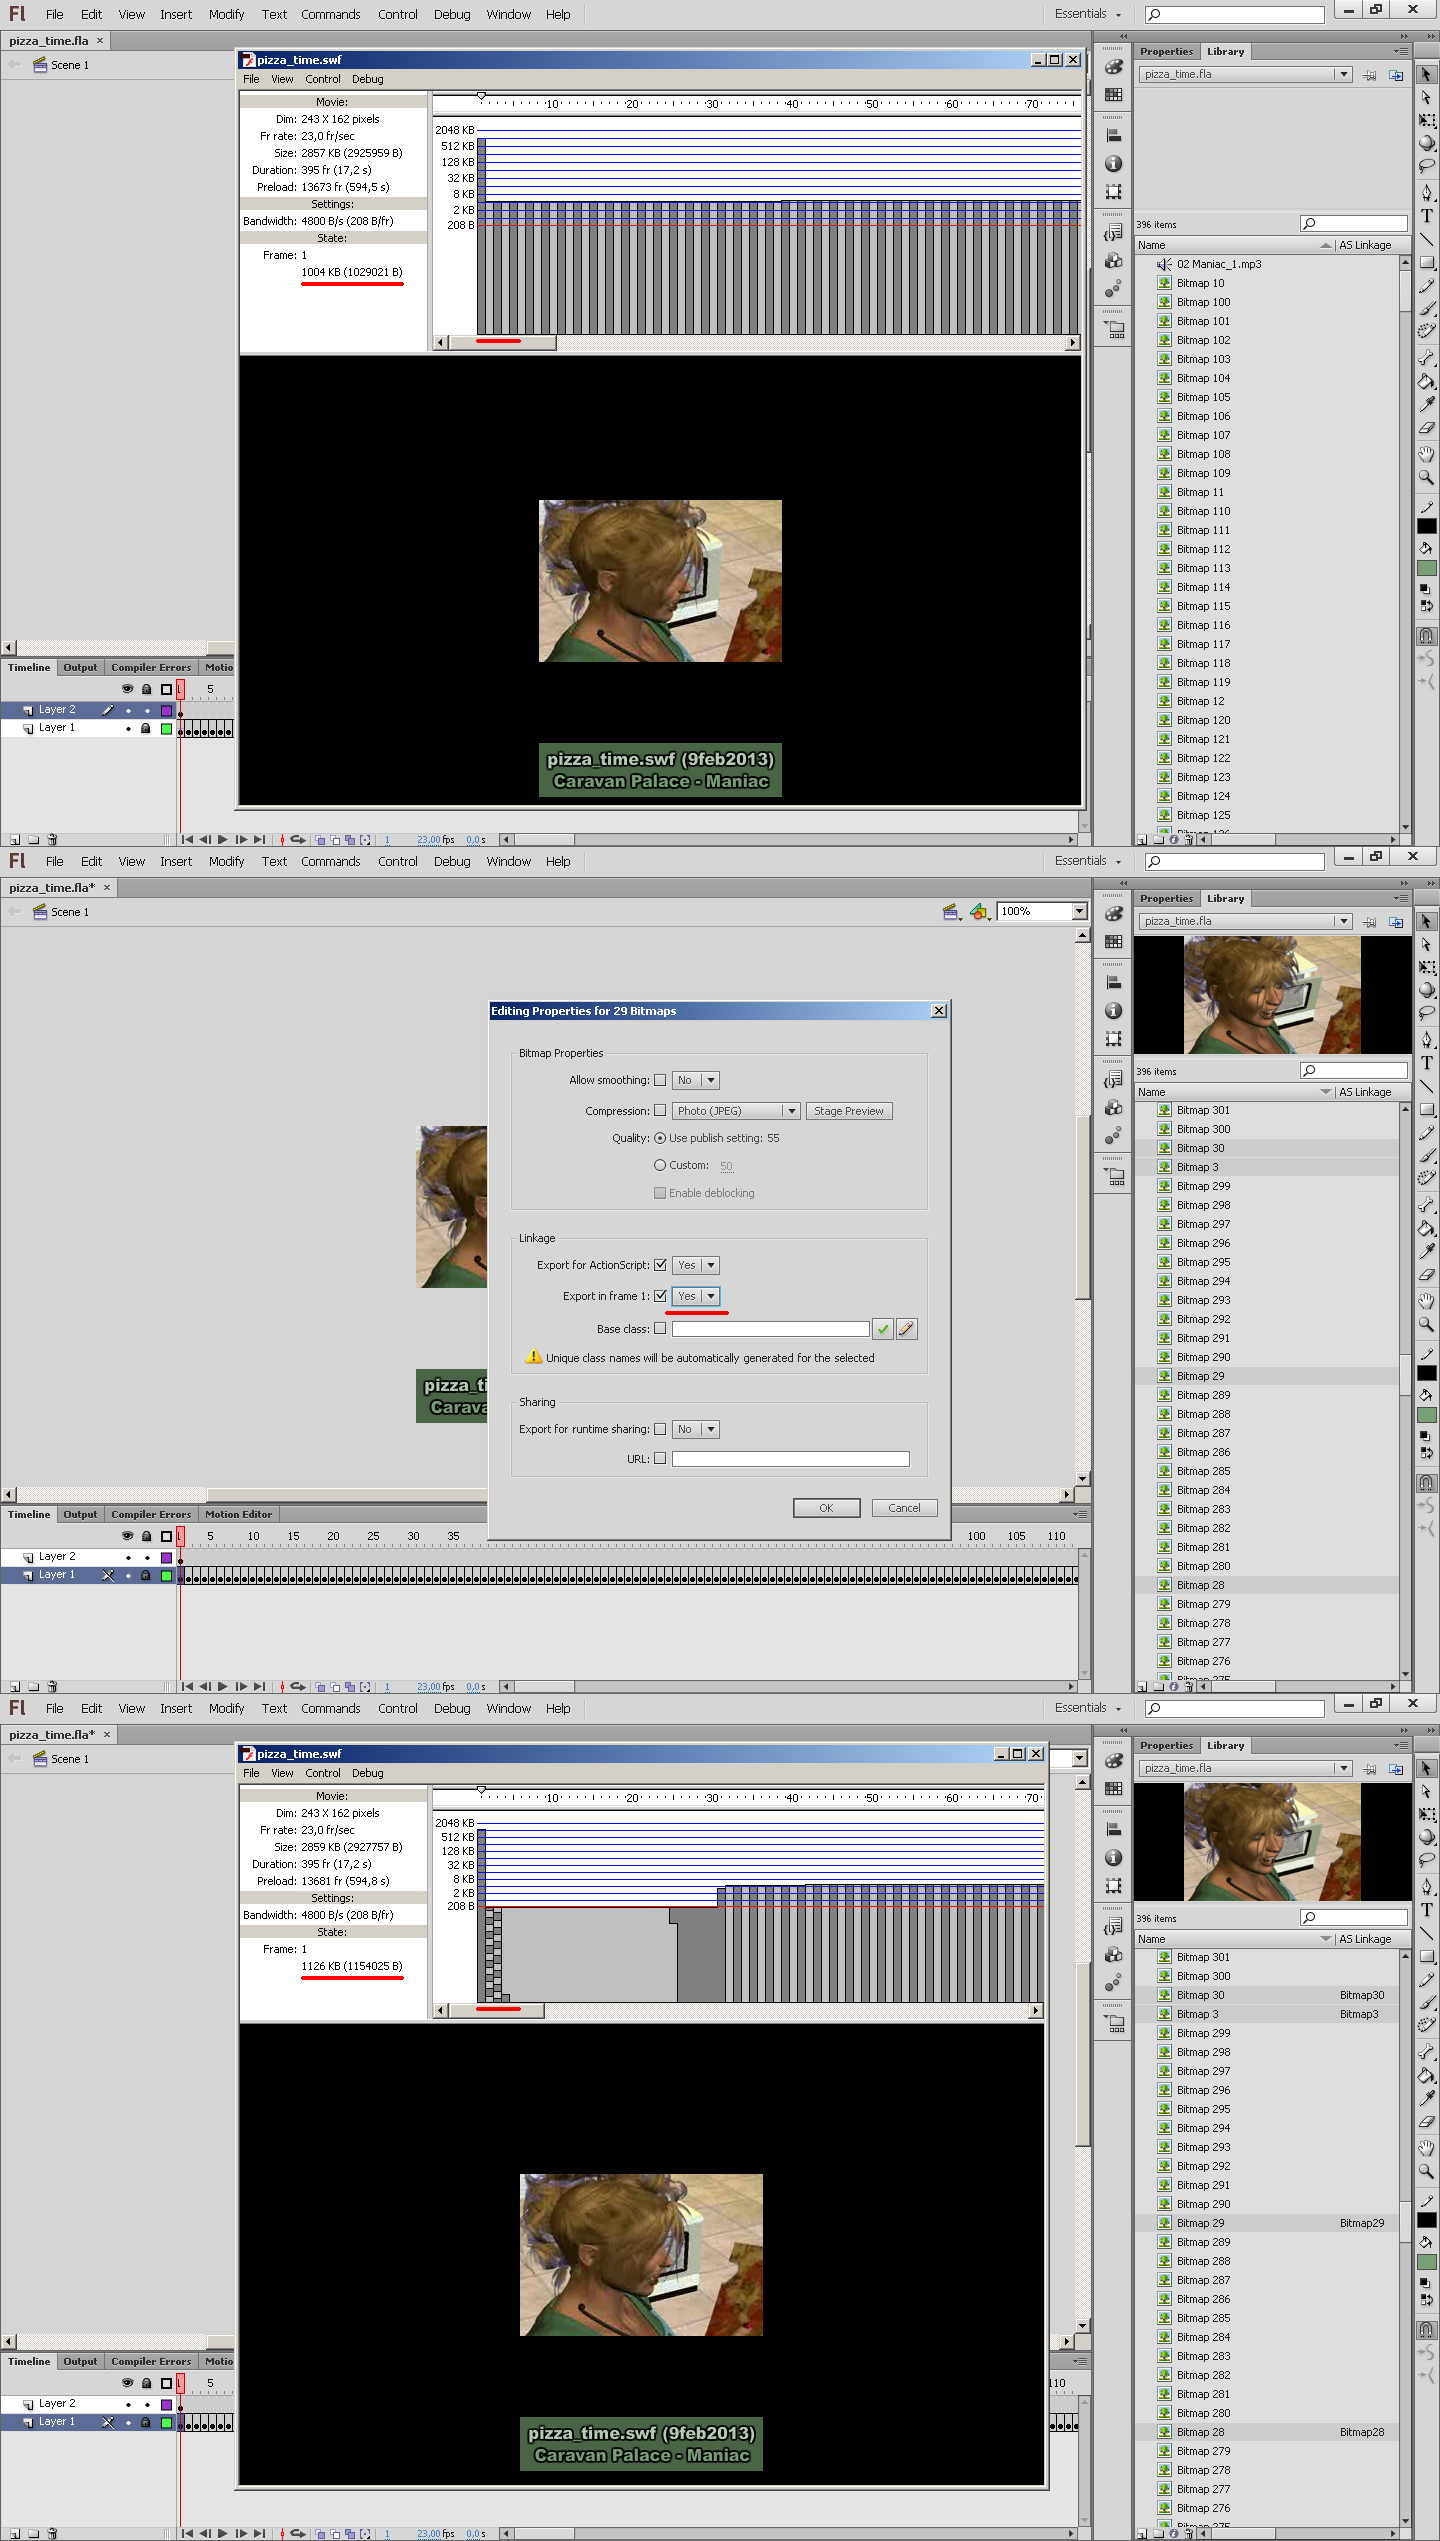
| >> | !///SWFAnts 9feb2013(sa)21:45 No.5556 OP P11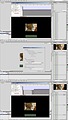 BONUS 2: Preloading resources BONUS 2: Preloading resourcesFlash works like so that as soon as frame 1 has been downloaded to the client it starts playback. Since the audio is exported on the first frame this means that as soon as the audio has downloaded the flash loop begins. If it "catches up" to the frame on the timeline that has not yet been downloaded the visuals will stop and wait until more has been downloaded and playback then resumes. This is not a problem if there is enough bandwidth to download more frames per second than the number of frames shown per second in the flash loop. The higher FPS your flash has the higher risk there is of your visuals to stop for a moment while more frames are being downloaded. To help prevent this some of the first images to be shown in the flash loop can be exported in the first frame along with the audio. This creates some buffer room that reduces the chance of the playback to "catch up" with the not-yet-downloaded part of the timeline. + By pressing CTRL + Enter the flash loop is exported and previewed inside Flash Pro. This Debug Flash Player has some useful tools. Go to "View" > "Bandwidth Profiler". Here we can see how much bytes that are exported in the first frame of the flash loop. Mine has 1004 KB of data (the music + the first image in the gif).
+ If we close the player and go to the library we can select the first bitmaps to be exported in the first frame. Hold CTRL and click them. Thanks to the stupid naming and ordering of items in the library this can be quite bothersome (Flash Pro even begun numbering the bitmaps on 3 for some reason).
+ When you have selected what you think is a number of items that creates a good buffer zone, right-click one of them and select properties.
+ Under Linkage, you'll see "Export in frame 1". Click the drop-down menu and select Yes. Export for ActionScript will also be set to Yes and two checkboxes will be ticked. This is fine. Press OK to close the dialogue.
+ Press CTRL + Enter again to export a new preview and check the bandwidth profiler. For me my first frame has increased in size to 1126 KB and the first couple of frames after that has been reduced in size from about 4 KB each to below 20 bytes each. We have successfully created a buffer zone that may prevent the visuals from halting during downloading of the flash. My buffer zone was around 28 frames, giving ~1.22 sec of room for net lag at my loop's 23 FPS. As long as my loop can be downloaded at average 92 KiB/s the buffer should prevent the visuals from stopping. You should adapt the size of your buffer zone depending on your flash's frame rate and on how much data is in each frame after the buffer zone has ended. Just don't use a too big buffer zone, flash streaming capabilities are gold and should not be wasted (part of the reason why loading screens are a real shame in flash loops, or any flash). |
|
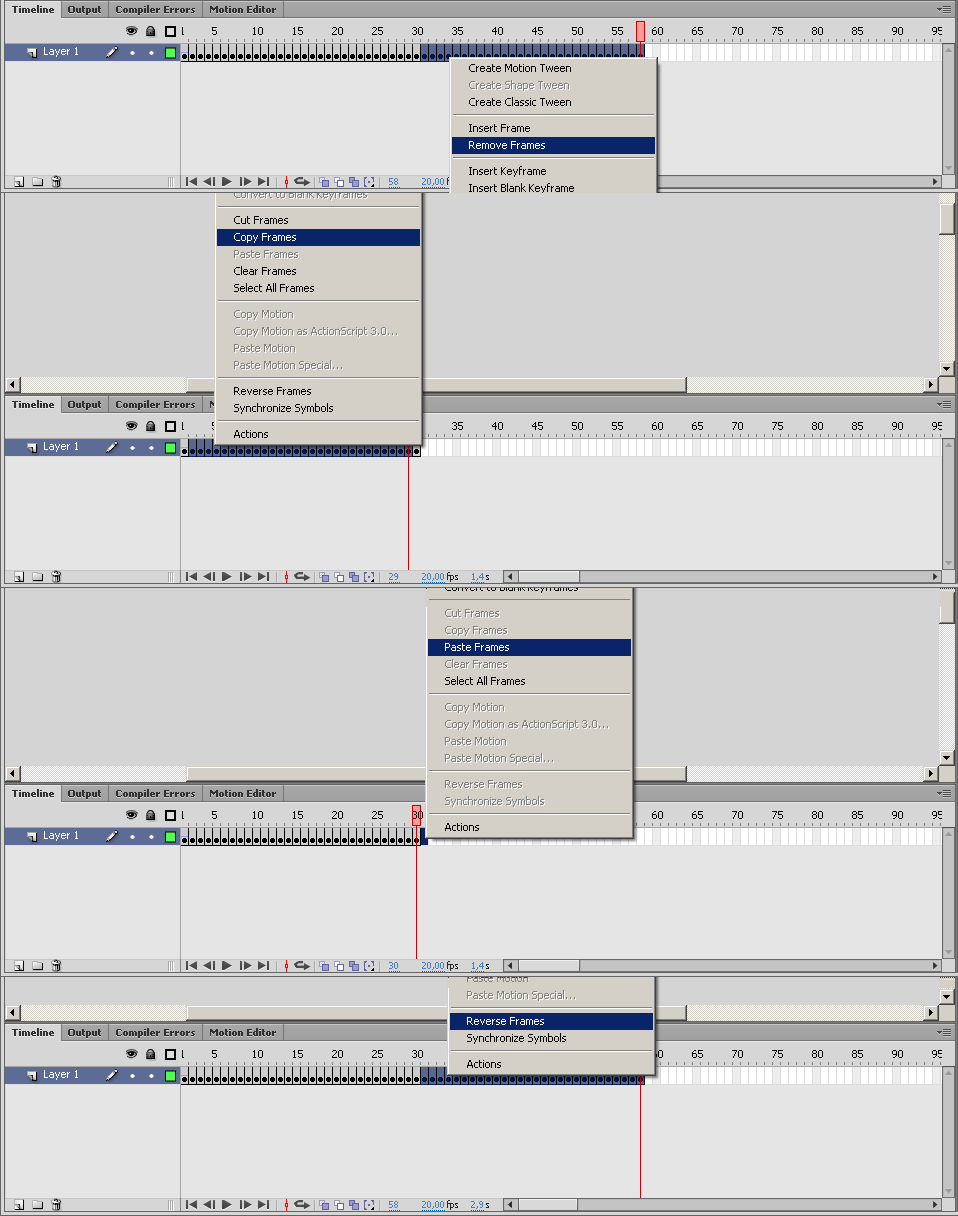
| >> | !///SWFAnts 9feb2013(sa)22:20 No.5557 OP P12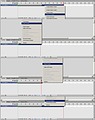 BONUS 3: Reusing resources BONUS 3: Reusing resourcesSometimes you want to use the same image twice in your flash loop. If you use the same item in the library twice this doesn't increase the file size of your loop. Say that you use a fairly common type of gif: One that goes back and forth. Can for example be someone dancing for 30 frames, then it has frames 2-29 in reverse (total of 58 frames). When you import this type of gif into Flash Pro it will split all of the gif's frames into their own images, even those in reverse. This means data is repeated for no reason, all it does is add bytes to the final flash loop. What you should do in this situation is replace the repeated images with instances of the earlier same-looking image. + Select the keyframes that has images going in reverse. Right-click and remove these.
+ Mark the keyframes that has the same-looking images as those you just removed, just that they are in the wrong order. In the example this is frame 2-29. Note that 1 and 30 is not selected, if they were instanced twice it would look like the visuals pause shortly twice in the animation because these same-looking keyframes would be next to each other.
+ Copy the marked keyframes. Right-click on the first empty (non-existant) frame slot to the right of the currently last keyframe. Paste the copied keyframes.
+ Select these duplicate keyframes and right-click. Select reverse. You've now created a flash loop that looks exactly the same as the gif going back and forth, but it takes about half the disk space since the same images are instanced twice in the timeline. A library item can be reused a million times without increasing the size of your flash (other than a few bytes for info such as references and positions). So if you notice a library item that looks exactly the same as another - get rid of it and reuse the other one instead. |
|
| >> | ㄹㅍ 18feb2013(mo)19:22 No.5585 A P13R1| ㅍㅍ34 spam (USER WAS BANNED FOR THIS POST) |
|
| >> | ㄹㅍ 18feb2013(mo)19:23 No.5586 A P14| spam (USER WAS BANNED FOR THIS POST) |
|
| >> | Anonymous 19feb2013(tu)15:17 No.5594 B P15R2Just askin OP, wouldn't it be more consistent to have posted the flash right into this thread?
Also thx for the guide, I finally made a flash loop myself. |
|
| >> | !///SWFAnts 19feb2013(tu)18:00 No.5597 OP P16R3>>5594
Right now /how/ doesn't accept swf uploads so that's why it's not in this thread. Suppose it could be changed but there should really only be flashes in /show/, /fap/, /gg/ and /swf/. More order that way.The flash is up on /swf/ right now: http://swfchan.org/1920/ However it will 404 there eventually and then only the link on eye.swfchan.com will work, which is why I used that in my earlier post. Glad I helped you out! Got any link to your loop(s)? I'd love to see what people create from this guide. |
|
| >> | Anonymous 12aug2013(mo)04:21 No.7803 C P17R4| I'm going to make a simple loop from this guide soon. Thanks a lot for helping amateur /f/ anons. If you come up with more guides please post them since I'm sure lots of anons would like to learn how to /f/lash. Zone and NCH inspire us a lot. |
|
| >> | !///SWFAnts 13aug2013(tu)16:46 No.7817 OP P18R5>>7803
You're most welcome, glad you found it useful! I'd like to see how it turns out if you want to upload it to /swf/ later. |
|
| >> | Anonymous 28aug2013(we)17:37 No.7990 D P19R6>>7817
Done.(Sorry for the late reply btw). I'm going to try the old NCH animation tutorial next.
>a_flash_tutorial_part2.swf |
|
| >> | Anonymous 14oct2014(tu)08:24 No.15585 E P20R7>>7817
SWFAnts its me again. The noob anon who made Cirno Autism.swfI'm currently learning how to make a basic platform game and I applied your looped music tutorial in this .swf as well. It will be shitty as hell but well I'm still picking up this hobby... I will upload it to /swf/ once I finish it. |
|
| >> | !///SWFAnts 15oct2014(we)17:12 No.15604 OP P21R8>>15585
Cool, will be interesting to see. Put it on /gg/ though, that's where games should be. /swf/ is for small flashes such as music loops. |
|
| >> | Anonymous 16oct2014(th)00:50 No.15611 E P22R9>>15604
Well fug. Too late if you can delete it by all means feel free to do so... It was just an experiment anyways to get the basic idea of a platform game.Right now I'm making an RPG. |
|
| >> | !///SWFAnts 16oct2014(th)23:05 No.15636 OP P23R10>>15611
No worries, I can move flashes between the boards. I do it all the time. In this case your flash isn't really a game yet though so it may stay on /swf/. You have to work a bit on hitbox collision detection, it's important in platformer games where you have to be able to make precise jumps. Camera movement looks good. Though you've probably moved on from the project if you're making an RPG now. |
|
| >> | Anonymous 18oct2014(sa)08:53 No.15665 E P24R11>>15636
Good advice. But meh that platform "game" was just the basic stuff, the level design is horrible as well lol, its all rushed.I'm learning the RPG coding because in the future I want to make a platformer with RPG elements (hp bar, stamina bar, attack, defense, stats, items, etc). Also I would like to use some of the 4chan board-tan characters, so I will have to learn spriteing at some point as well (the GraphicsGale software is supposedly good for sprite making). Something like Castlevania: Symphony of The Night but with Dark Souls difficulty. 2D Dark Souls basically. Just an idea I had. |
|